Table of Contents
Hi there, I’m Carlos, and I’m excited to share a fun and creative recipe with you that’s perfect for Halloween or any party – Monster Burgers! These delightful and spooky burgers are not only a hit with kids and adults but also a great way to unleash your creativity in the kitchen. You can whip them up in about 30 minutes, making them a perfect option for a quick meal that’s sure to impress. So let’s get into this and have some fun!
Why You’ll Love These Monster Burgers
These Monster Burgers are packed with fun and creativity, perfect for getting everyone involved in the kitchen. Here are a few reasons why you’ll love them:
- Customizable: You can easily tweak the ingredients and monster features to suit your style or your guests’ preferences.
- Kid-Friendly: Kids will love helping out in the kitchen, assembling their own spooky faces for Halloween, and getting creative with toppings.
- Party Hit: These burgers are guaranteed to be a crowd-pleaser at any Halloween gathering or themed party, bringing smiles to everyone’s faces.
- Easily Assemble: The straightforward steps mean you can have fun while cooking without feeling overwhelmed.
Ingredients for the Best Monster Burgers
Here’s what you’ll need to create your Monster Burgers:
- 20 oz ground beef (80/20 is best – this will allow for 5 oz per burger)
- 1-2 teaspoons oil
- 8 medium black olives
- 8 mini mozzarella balls (bocconcini, a little over 1-ounce or 28 grams each, patted dry with paper towels)
- 8 tomato slices (from about 2 tomatoes)
- 4 slices orange cheddar
- 4 pieces of green lettuce (rinsed and patted dry with paper towels)
- 4 pickle slices
- 4 hamburger buns (use gluten-free buns if you’re GF)
How to Make Monster Burgers: Step-by-Step Instructions
Let’s get started on creating these deliciously spooky burgers!
- Form four 5-oz hamburger patties. They should be 1” wider than your buns.
- Press your thumb into the middle of each patty. This is done to prevent them from plumping up like meatballs during cooking.
- Salt and pepper the outsides.
- Preheat a skillet over medium heat. Add a small bit of oil and put in the patties.
- Cook until done, only flipping once. How long that takes depends on how thick your patties are and how well done you want. The USDA recommends that ground beef be cooked to an internal temperature of 160 °F, resulting in a well-done burger with no pink in the center.
- While they’re frying, prepare the monster face.
- Cut the olives in half and stick the half with the “star” face up on top of a mini mozzarella ball. Secure them together using a toothpick.
- Cut 8 slices from the tomatoes. They shouldn’t be puny and floppy, but not super thick, either. Place them on a paper towel and pat dry before placing on the burger.
- Cut out triangles from the cheese slice to create the teeth. Don’t cut away too much – you want the teeth to hang out from the bun.
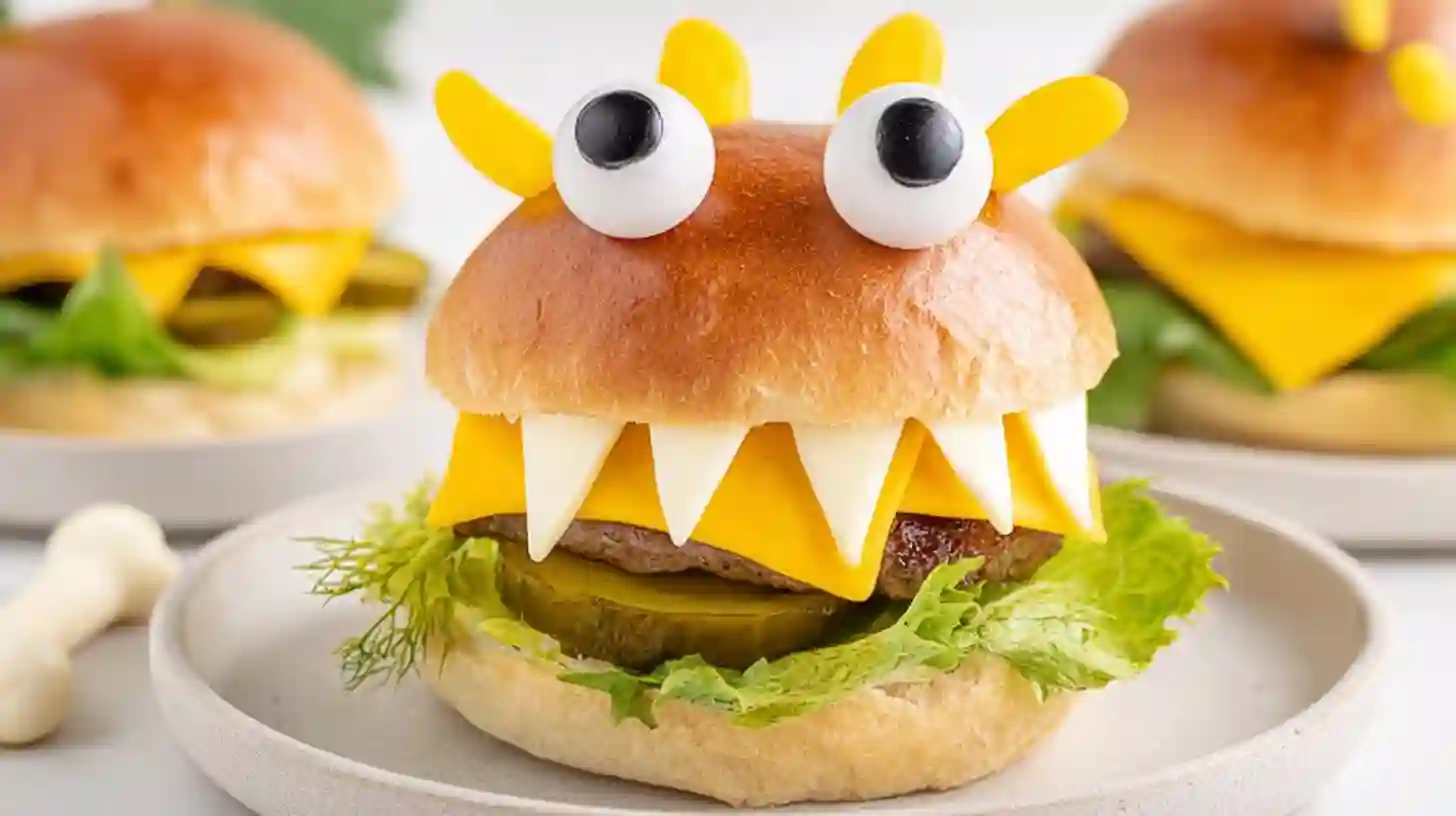
- Assemble the burgers
- Once the burgers have cooled quite a bit (you don’t want to melt the cheese), place a piece of lettuce on the bottom bun half. Then add the burger patty, 2 tomato slices next to each other, pickle in the middle to create the tongue, cut up cheese slice, top bun piece.
- Stick 2 assembled mozzarella/olive eyes on each bun with the help of the toothpick.
- Serve!
Cooking Methods for Monster Burger Patties
While pan-frying is straightforward, you can also prepare these burgers using a few different techniques:
- Grilling: Cooking patties on a grill adds a smoky flavor. Preheat to medium-high, grill for about 5-7 minutes per side, reaching the same 160 °F internal temperature.
- Air Frying: For a healthier option, air fry at 375 °F for around 12-15 minutes, flipping halfway through for even cooking.
- Smoking: If you want to add even more flavor, smoke the patties at 225 °F for about 45-60 minutes. Just be sure to check the internal temperature.
Get Creative: Unleashing Your Inner Monster Chef
Want to take your Monster Burgers to the next level? Here are some fun ideas to get those creative juices flowing:
- Bell Peppers: Use halved bell peppers for monster horns.
- Different Cheese Shapes: Experiment with various cheese to create unique monster features.
- Colored Sauces: Use tinted mayo or ketchup for a spooky touch.
- Edible Googly Eyes: Add a playful element to your burgers for extra fun.
- Onion Rings as Halos: Create a quirky monster look with onion ring halos.
Spooky Sauces and Toppings to Elevate Your Monster Burgers
Let’s elevate these burgers beyond the basics. Consider these delicious alternatives:
- Bloody Sauces: Sriracha mayo or beet ketchup can add a haunting touch.
- Slime Sauces: A vibrant green aioli can create an eerie look.
- Unique Spreads: Try avocado spread or garlic mayo for a tasty twist.
Bun Selection: The Foundation of Your Monster
The bun you choose can make a big difference in your Monster Burgers. Here are some options to consider:
| Bun Type | Flavor Profile | Perfect Toasting Method |
|---|---|---|
| Brioche | Rich and buttery | Lightly toast for a golden crust |
| Potato | Soft and fluffy | Toast until slightly crispy |
| Sesame | Nutty and warm | Toast to retain a firm bite |
| Whole Wheat | Earthy and hearty | Toast to firm up and enhance texture |
Dietary Adaptations for All Monster Lovers
Catering to different dietary needs is easy with these substitutions:
| Diet Type | Ingredient Swap |
|---|---|
| Gluten-Free | Use gluten-free hamburger buns |
| Dairy-Free | Substitute with vegan cheese |
| Vegetarian/Vegan | Replace ground beef with veggie patties |
| Low-Carb | Use lettuce wraps instead of buns |
Kid-Friendly Fun: Getting the Little Monsters Involved
Involve your little ones in the kitchen with these fun tasks:
- Ages 2-3: Let them wash veggies or pat dry lettuce.
- Ages 4-5: Help with assembling the components of the monster face.
- Ages 6-7: Assist with cutting softer ingredients like cheese with supervision.
- Safety Reminder: Ensure that toothpicks are closely monitored and removed after assembly.
Making Ahead and Storage Tips
You can prep parts of this recipe in advance:
- Cooked Patties: Store them in the fridge for up to 3 days or freeze them for later.
- Build Your Monster: Keep assembled burgers in the fridge, but add fresh toppings just before serving to keep them crisp.
Troubleshooting Common Monster Burger Problems
Even the best cooks face challenges. Here are some tips for common issues:
- Eyes Falling Off: Be sure the toothpick is securely fastened and not overly long.
- Melting Cheese Too Much: Let the patties cool slightly before adding the cheese.
- Uneven Shrinking of Patties: Ensure uniform patty thickness for even cooking.
Beyond Halloween: Monster Burgers for Any Occasion
These fun burgers can be adapted for any celebration:
- Friendly Monsters: Use bright colors and cheerful toppings for birthday parties.
- Sports Themes: Create team colors with toppings and decorations.
- Seasonal Themes: Adapt the colors and styles based on the season or holiday.
Monster Burgers for a Crowd: Scaling Up the Spookiness
When hosting a larger gathering, follow these tips for efficient assembly:
- Batch Cooking: Cook multiple patties at once to save time.
- Assembly Line: Set up a station for assembling monster features, letting guests customize their own burgers.
Presentation is Key: Making Your Monster Burgers Picture-Perfect
A great presentation can make a difference.
Try these ideas:
- Garnish: Use fresh herbs or colorful veggies around the plate.
- Layering: Stack layers clearly to showcase the monster features.
- Themed Plates: Serve on themed plates or tablecloths to compliment the playful design.
Frequently Asked Questions
How long does it take to cook the patties?
Cooking time varies based on thickness but usually takes about 8-10 minutes in total, flipping once. Make sure to reach an internal temperature of 160 °F.
Can I use frozen burger patties?
Yes, you can use frozen patties. Just increase the cooking time and ensure they reach the appropriate internal temperature before serving.
What can I serve with Monster Burgers?
These burgers pair fabulously with fries, veggie sticks, or a fresh salad for a complete meal.
In conclusion, Monster Burgers are not just another meal; they’re an opportunity for creativity, fun, and making lasting memories. I encourage you to give this recipe a try and customize it with your own spooky ideas. I’d love to hear about your creations, so feel free to leave a comment, share your experiences, or ask any questions you may have. Happy cooking!

Scary Good Monster Burgers: Fun & Easy Recipe
Equipment
- skillet
- Toothpick
- paper towel
- grill
- air fryer
- smoker
Ingredients
- 20 oz ground beef 80/20 is best – this will allow for 5 oz per burger
- 1-2 teaspoons oil
- 8 medium black olives
- 8 mini mozzarella balls bocconcini, a little over 1-ounce or 28 grams each, patted dry with paper towels
- 8 tomato slices from about 2 tomatoes
- 4 slices orange cheddar
- 4 pieces green lettuce rinsed and patted dry with paper towels
- 4 pickle slices
- 4 hamburger buns use gluten-free buns if you’re GF
Instructions
- Form four 5-oz hamburger patties. They should be 1” wider than your buns.
- Press your thumb into the middle of each patty. This is done to prevent them from plumping up like meatballs during cooking.
- Salt and pepper the outsides.
- Preheat a skillet over medium heat. Add a small bit of oil and put in the patties.
- Cook until done, only flipping once. How long that takes depends on how thick your patties are and how well done you want. The USDA recommends that ground beef be cooked to an internal temperature of 160 °F, resulting in a well-done burger with no pink in the center.
- While they’re frying, prepare the monster face.
- Cut the olives in half and stick the half with the “star” face up on top of a mini mozzarella ball. Secure them together using a toothpick.
- Cut 8 slices from the tomatoes. They shouldn’t be puny and floppy, but not super thick, either. Place them on a paper towel and pat dry before placing on the burger.
- Cut out triangles from the cheese slice to create the teeth. Don’t cut away too much – you want the teeth to hang out from the bun.
- Assemble the burgers
- Once the burgers have cooled quite a bit (you don’t want to melt the cheese), place a piece of lettuce on the bottom bun half. Then add the burger patty, 2 tomato slices next to each other, pickle in the middle to create the tongue, cut up cheese slice, top bun piece.
- Stick 2 assembled mozzarella/olive eyes on each bun with the help of the toothpick.
- Serve!
Notes
Printable Recipe Card
Want just the essential recipe details without scrolling through the article? Get our printable recipe card with just the ingredients and instructions.

A 48-year-old contributing writer based in New York City. He is known for his insightful articles on American cuisine and food culture. With a lifelong passion for cooking and storytelling, David began his journey in the culinary world as a chef before transitioning to writing. He has contributed to various food magazines and blogs, sharing his experiences, recipes, and culinary tips, inspiring home cooks and food enthusiasts alike. Through his engaging writing style, David explores the rich tapestry of American cuisine, celebrating its diversity while encouraging readers to experiment in their own kitchens.