Table of Contents
Creating a Heart Valentine’s Cake is a delightful way to express love and care, especially when the occasion calls for something extra special. I remember the first time I baked a heart-shaped cake for Valentine’s Day; the way the cake came together and the joy it brought to my loved ones was simply unforgettable. Here at The Day of Recipes, I aim to make your baking experience just as enjoyable. This guide will walk you through various methods for crafting the perfect heart-shaped cake, from baking to decorating. The whole process will take about 1.5 to 2 hours, considering both baking and decorating, but I promise the result will be worth every minute.
Why You’ll Love This Recipe
- This guide covers multiple heart-shaping techniques to suit your skill level and needs.
- It includes advanced decoration ideas that will wow your loved ones.
- You’ll find troubleshooting tips to help ensure your cake turns out just right.
- I provide a proven recipe that has been refined for success every time!
Choosing Your Heart Cake Style
When deciding how to create your heart-shaped cake, consider which style best suits your skills and the time you have available. Here are some popular heart cake options:
- Heart-Shaped Cake Pan: This method is straightforward; simply pour your batter into the pan. Pros are ease of use, while the con could be limited size.
- Cutting a Heart from Round/Square Cakes: This technique allows flexibility in design, but it requires a steady hand to cut the cake into shape.
- The “Surprise Inside” Heart Cake: For a creative twist, you can bake an inner heart layer. It’s an impressive surprise for guests!
- Heart-Shaped Cupcakes/Mini Cakes: These small versions are perfect for a fun and easy presentation.
Tools and Equipment
Before you start baking, gather these essential tools:
- Heart-Shaped Cake Pan: Ideal for easy baking.
- Spatulas: For frosting the cake smoothly.
- Cake Levelers: To achieve even layers.
- Various Piping Tips: For adding decorative touches.
- Non-Stick Spray: Ensures easy removal of the cake from pans.
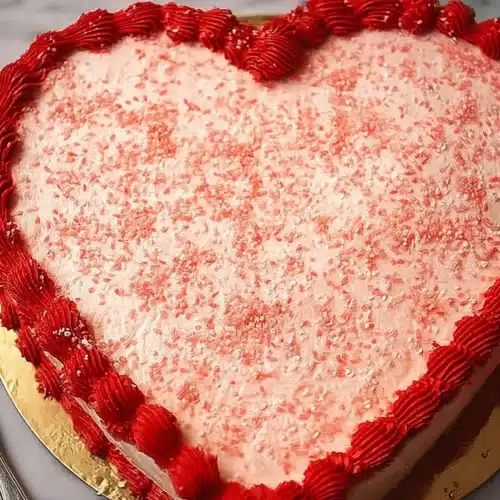
Core Recipe: Red and White Velvet Heart Cake
I’m excited to share a classic and visually stunning option for a Heart Valentine’s Cake: the Red and White Velvet Cake. This cake boasts a rich flavor and beautiful appearance, making it a show-stopper for special occasions.
Ingredients for Red and White Velvet Heart Cake
- 1 recipe White Velvet Cake
- Super Red Gel Food Coloring
- 1 tbsp unsweetened Dutch-processed cocoa powder, (whisked free of lumps)
- 4x recipe Perfect American Buttercream
- Super Red Gel Food Coloring
Step-by-Step Instructions
- Preheat the oven to 350, and spray the bottoms of three 8-inch cake pans with non-stick spray.
- Prepare the White Velvet Cake batter as instructed.
- Divide 2/3 of the cake batter between 2 of the pans.
- To the remaining 1/3 of the cake batter, add the cocoa powder (it’s helpful to sift the cocoa powder over the cake batter and then whisk it in, to avoid lumps). Add a few drops of red gel food coloring until you have your desired shade of red. Pour the red batter into the 3rd cake pan.
- Bake on the center oven rack for about 25-30 minutes, until a cake tester or toothpick comes out clean. Set the pans on a wire rack, cover loosely with a clean kitchen towel, and cool completely before frosting.
- Prepare the American Buttercream as instructed: you’ll need to make 4x the recipe to have enough to frost a 3-layer cake. For a bright white buttercream, substitute shortening for 1/2 of the butter in the recipe.
- Remove the cooled cakes from the cake pans, and place one of the white cakes on a cake board. Frost with a layer of buttercream.
- Add the red cake layer next, frost with a layer of buttercream, and top with the other white cake so that the red is sandwiched between two layers of white.
- Frost the cake all over with a thin crumb coat of buttercream. Chill in the refrigerator for 30 minutes.
- Frost the cake with a final pretty coat of buttercream. You can make it smooth or swirly, whatever you like. Chill in the refrigerator for 30 minutes.
- Take the remaining buttercream (you’ll only need 1/2 cup) and tint it red with the red food coloring. Fit a piping bag with a coupler and tip #3; fill with the red buttercream.
- Pipe small red hearts all over the cake. You can line them up evenly like a polka-dot pattern, or make them random. Here is a helpful Wilton tutorial on piping these easy, pretty hearts.
How to Make a Heart Cake: Shaping Methods
There are several ways to achieve a heart shape, and each method has its own charm.
Using a Heart-Shaped Cake Pan
Baking in a specialty pan simplifies the process. Ensure that you use a quality pan to avoid sticking, and grease it appropriately for best results.
Cutting a Heart from Round/Square Cakes
Start with two round cakes. By trimming them down in a strategic manner, you can form heart shapes. This method allows you to combine flavors and designs seamlessly.
The “Surprise Inside” Heart Cake
To create an internal heart pattern, bake a smaller heart cake and use a cookie cutter to carve out the central heart. Embed it within a larger cake for a delightful unveiling.
Heart-Shaped Cupcakes/Mini Cakes
If you’re short on time, consider baking heart-shaped cupcakes using liners designed for the occasion. It’s a crafty way to celebrate Valentine’s Day!
Advanced & Creative Decoration Ideas
Once your cake is baked and frosted, let your creativity shine through with these advanced & creative decoration ideas:
Ombre Frosting Techniques
Create a stunning ombre effect by gradually mixing in more food coloring to your frosting.
Detailed Piping Designs
Try piping intricate rosettes or borders. The piping tips you choose will make a significant difference in your final look.
Using Stencils
Stencils can allow you to add dazzling powdered sugar designs, which can accentuate the elegance of your heart cake.
Edible Glitter, Sprinkles, and Candy Arrangements
Don’t shy away from adding a sparkle! Chocolate and candy decorations can lend a festive touch.
Fresh Fruit Decoration
Consider embellishing your cake with strawberry roses or a pattern of fresh berries for a fresh and vibrant look.
Chocolate Ganache Drips or Chocolate-Dipped Elements
To elevate your cake’s appearance, add chocolate ganache drips or even chocolate-dipped fruits to decorate.
Flavor Profiles & Complementary Pairings
When selecting flavors that scream “Valentine’s Day,” think about red velvet, chocolate cherry, or strawberry champagne. Pair these cakes with a glass of sparkling wine or a rich coffee to enhance the experience.
Heart Cake Hacks for Busy Bakers
For those pressed on time, here are a few hacks:
Using Box Cake Mixes
Boxed cake mixes can be utilized effectively by adjusting the baking time and customizing flavors or add-ins.
Semi-Homemade Options
Using a store-bought cake as a base and then embellishing it with homemade frosting can save time while still delivering a handmade feel.
General Baking Tips
Be sure to prepare your pans adequately, avoid overmixing, and cool your cakes completely before frosting. These small steps are pivotal for the perfect cake.
Make-Ahead and Freezing Tips
To reduce last-minute stress, bake your layers ahead of time and freeze them. Make the frosting a day in advance to allow the flavors to meld together.
Troubleshooting Common Heart Cake Issues
If you run into issues, here are some common ones:
Uneven Layers
Ensure that you level your cakes before layering them for uniformity.
Cracked Cakes
Cracking may happen due to a sudden temperature change. Maintain an even heat in your oven and avoid overmixing.
Frosting Woes
Address the consistency of your frosting by adding liquid for thinning or more sugar for thickening.
Maintaining Shape During Assembly
When assembling, ensure the cakes are completely cooled to prevent slippage and maintain your heart shape.
Gifting and Presentation
If you’re planning to gift your Heart Valentine’s Cake, package it in a decorative cake box. A beautiful presentation enhances the gift, making it all the more special.
Dietary Adaptations
For those requiring gluten-free or vegan options, consider using substitutes like almond flour or flaxseed meal for the cake and dairy-free frosting.
Frequently Asked Questions
What size heart-shaped pan should I use?
Choose a pan size based on your guest count, typically 8 or 9 inches in diameter suffices for most occasions.
Can I use different types of food coloring?
Absolutely! Gel food coloring is best for vibrant shades while liquid ones can dilute your batter.
How do I prevent my cake from overflowing?
Be mindful not to fill your pans more than 2/3 full to ensure proper baking.
Why did my internal hearts rise to the top?
This can happen if the batter is too light; ensuring even batter consistency can help.
How do I adapt this recipe for high altitude?
Adjusting baking time and temperatures is key for high-altitude baking success.
Make an Amazing Heart Valentines Cake
Equipment
- Heart-Shaped Cake Pan
- Spatulas
- Cake Levelers
- Piping Tips
- Non-Stick Spray
Ingredients
- 1 recipe White Velvet Cake
- Super Red Gel Food Coloring
- 1 tablespoon unsweetened Dutch-processed cocoa powder (whisked free of lumps)
- 4 x recipe Perfect American Buttercream
- Super Red Gel Food Coloring
Instructions
- Preheat the oven to 350, and spray the bottoms of three 8-inch cake pans with non-stick spray.
- Prepare the White Velvet Cake batter as instructed.
- Divide 2/3 of the cake batter between 2 of the pans.
- To the remaining 1/3 of the cake batter, add the cocoa powder (it’s helpful to sift the cocoa powder over the cake batter and then whisk it in, to avoid lumps). Add a few drops of red gel food coloring until you have your desired shade of red. Pour the red batter into the 3rd cake pan.
- Bake on the center oven rack for about 25-30 minutes, until a cake tester or toothpick comes out clean. Set the pans on a wire rack, cover loosely with a clean kitchen towel, and cool completely before frosting.
- Prepare the American Buttercream as instructed: you’ll need to make 4x the recipe to have enough to frost a 3-layer cake. For a bright white buttercream, substitute shortening for 1/2 of the butter in the recipe.
- Remove the cooled cakes from the cake pans, and place one of the white cakes on a cake board. Frost with a layer of buttercream.
- Add the red cake layer next, frost with a layer of buttercream, and top with the other white cake so that the red is sandwiched between two layers of white.
- Frost the cake all over with a thin crumb coat of buttercream. Chill in the refrigerator for 30 minutes.
- Frost the cake with a final pretty coat of buttercream. You can make it smooth or swirly, whatever you like. Chill in the refrigerator for 30 minutes.
- Take the remaining buttercream (you’ll only need 1/2 cup) and tint it red with the red food coloring. Fit a piping bag with a coupler and tip #3; fill with the red buttercream.
- Pipe small red hearts all over the cake. You can line them up evenly like a polka-dot pattern, or make them random. Here is a helpful Wilton tutorial on piping these easy, pretty hearts.
Notes
Conclusion
Baking a Heart Valentine’s Cake is not only about the delicious result, but it’s also about the love and effort you put into it. I hope this guide gives you the tools and inspiration to create something truly special. Please leave a comment or ask a question if you’re curious about any part of the process. I would love to hear about your baking adventures, so feel free to share your cake creations on social media! Happy baking!
Amelia Johnson is a 28-year-old chef from New Orleans, Louisiana, known for her innovative take on traditional American cuisine. Growing up in a family that celebrated food, she developed a passion for cooking early on, experimenting with recipes from her grandmother. After graduating from culinary school, Amelia honed her skills in top restaurants, where her talent quickly gained acclaim for its creative dishes. With a focus on seasonal ingredients and bold flavors, she inspires others through cooking workshops, sharing her love for food and the rich diversity of American cuisine.