Table of Contents
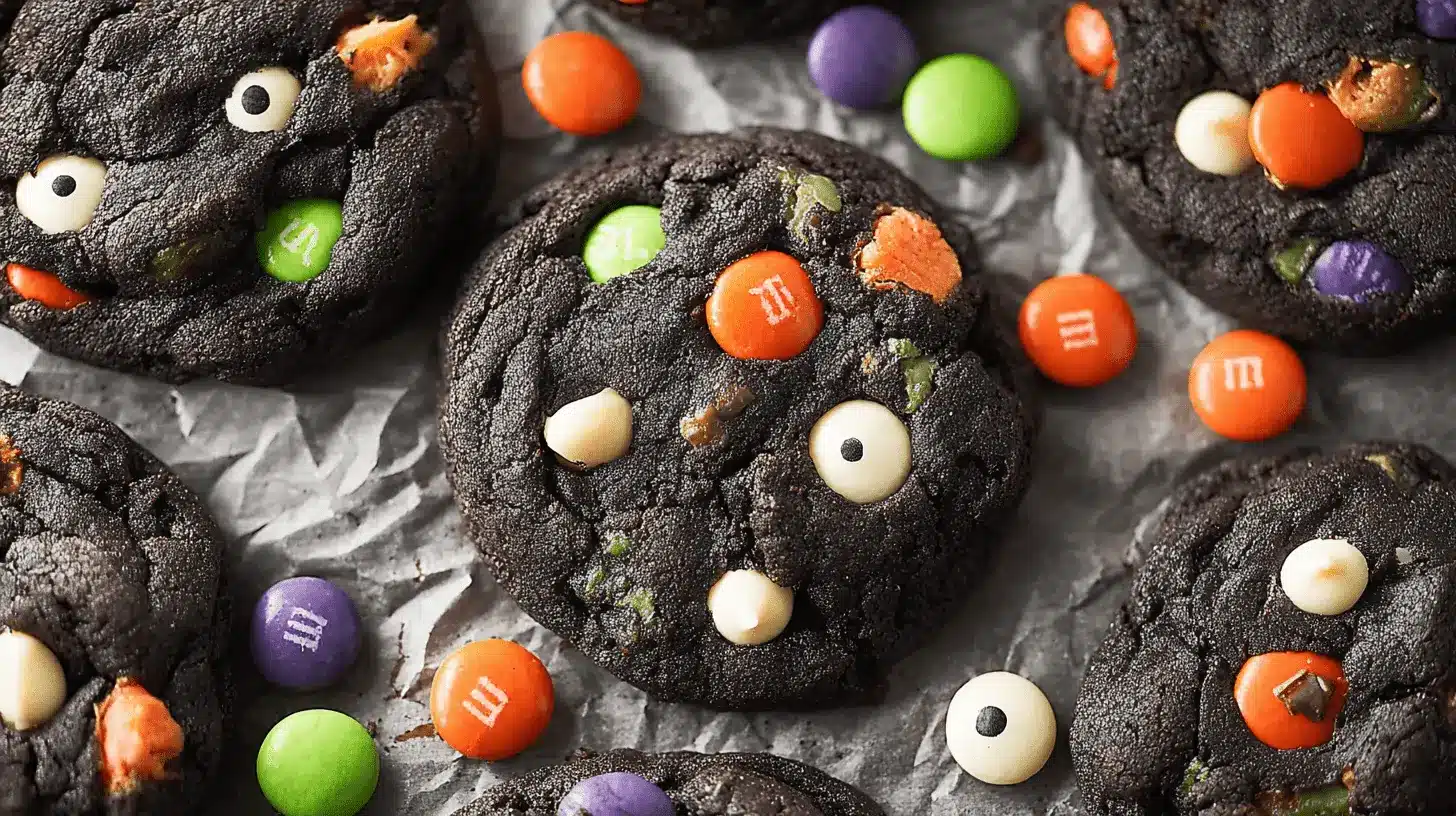
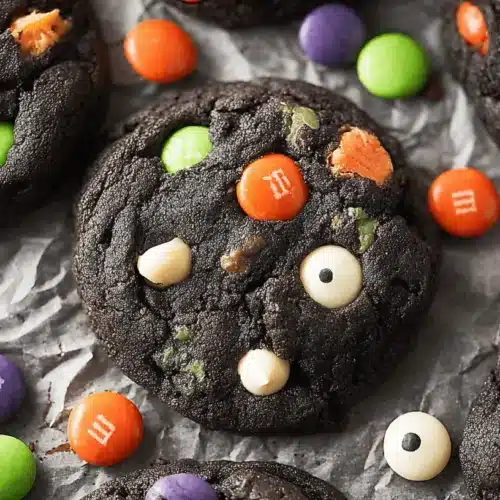
Get ready to conjure up some magic in your kitchen this spooky season! These delicious halloween cookies are incredibly easy to make. You need just one bowl and minimal prep time for a truly delightful treat. They are perfect for beginners and a fun activity for the whole family, guaranteed to be a hit at any Halloween gathering.
Why You’ll Love These Halloween Cookies
- Quick to Make: You can whip up a batch of these festive cookies in under 30 minutes, from start to finish.
- Kid-Friendly Fun: Involve your little ghouls and goblins in decorating these spooky treats.
- Delicious Double Chocolate: Rich black cocoa and sweet white chocolate chips create an irresistible flavor.
- Perfect for Parties: These eye-catching halloween cookies are ideal for any themed party or a cozy movie night.
- No Complicated Decorating: Simple candy eyeballs and colorful M&Ms make for easy, impressive results.
Ingredients
Gather your ingredients to create these delightful halloween cookies. You’ll need unsalted butter, granulated sugar, brown sugar, vanilla extract, and one egg for your wet base. For the dry elements, have all-purpose flour, black cocoa powder (or Dutch-process), cornstarch, fine sea salt, baking soda, and baking powder ready. Finally, for fun mix-ins, prepare white chocolate chips, Halloween M&Ms, and edible candy eyeballs.
- 1/2 cup (113 grams) unsalted butter, at cool room temperature
- 1/2 cup (100 grams) granulated sugar
- 1/4 cup (50 grams) brown sugar
- 1 teaspoon vanilla extract
- 1 egg, at room temperature
- 1 cup (127 grams) all-purpose flour
- 1/2 cup (43 grams) black cocoa powder (or Dutch-process), sifted
- 1 tablespoon cornstarch
- 1 teaspoon fine sea salt
- 1/2 teaspoon baking soda
- 1/4 teaspoon baking powder
- 1/2 cup (85 grams) white chocolate chips, plus more for garnish
- 1 cup (218 grams) Halloween M&Ms, plus more for garnish
- Edible candy eyeballs, for garnish
Notes & Substitutions
Accurately measure flour by spooning it into a measuring cup, then leveling it off. Black cocoa offers an intense, dark color and an Oreo-like flavor; Dutch-process cocoa provides a rich, slightly less dark chocolate taste. For more on the specific characteristics and uses of each, you can read about the differences between black cocoa powder and Dutch-process cocoa. Always use cool room temperature butter and eggs for the best cookie texture. Cornstarch ensures your cookies stay wonderfully soft. Feel free to swap white chocolate chips for milk or semi-sweet. You can also include Reese’s Pieces, chopped candy bars, or other spooky candies instead of M&Ms.
Equipment
You don’t need fancy tools to make these fun halloween cookies. A stand mixer with a paddle attachment makes mixing a breeze, but a hand mixer works too. You’ll also need standard baking sheets, parchment paper for easy cleanup, and a wire rack for cooling. A cookie scoop helps create uniform cookies, ensuring they bake evenly every time.
Instructions
Follow these simple steps to create amazing halloween cookies! These easy-to-follow instructions will guide you through baking perfect spooky treats for any occasion.
- Step 1: Prep Oven & Pans. Preheat your oven to 350 degrees F (175°C). Line two large baking sheets with parchment paper; this prevents sticking and ensures even baking for your cookies.
- Step 2: Cream Wet Ingredients. In the bowl of a stand mixer fitted with the paddle attachment, combine the cool room temperature butter, granulated sugar, and brown sugar. Beat on medium speed for about 3 minutes until the mixture appears light and fluffy. Scrape down the sides of the bowl. Add the vanilla extract and room temperature egg, then beat again until everything is well combined and smooth.
- Step 3: Combine Dry & Wet. In a separate medium bowl, whisk together the all-purpose flour, sifted black cocoa powder, cornstarch, fine sea salt, baking soda, and baking powder. Gradually add these dry ingredients to your wet mixture in the stand mixer. Mix on low speed until a slightly sticky, cohesive dough forms, being careful not to overmix. Using a rubber spatula, gently fold in the white chocolate chips and Halloween M&Ms until they are evenly distributed throughout the dough.
- Step 4: Scoop, Decorate & Bake. Using a large, spring-loaded cookie scoop (about 3 tablespoons per scoop), drop rounded balls of dough onto your prepared baking sheets. Space them at least 2 inches apart to allow for spreading. For extra visual appeal, gently press additional white chocolate chips, Halloween M&Ms, and edible candy eyeballs onto the top of each dough ball. Bake for approximately 12 minutes, or until the edges of the halloween cookies are set but the centers still look soft and slightly puffy. Avoid overbaking to keep them chewy. Let the freshly baked cookies cool on the baking sheet for 5 minutes before transferring them to a wire rack to cool completely.
Pro Tips & Troubleshooting
To prevent flat cookies, ensure your butter is cool room temperature, not melted, and do not overmix the dough. Slightly chilling the dough for 15-30 minutes can also help. Always avoid overbaking your halloween cookies to keep them wonderfully chewy; they will continue to set as they cool. Edible candy eyeballs typically hold their shape in the oven, but if you are concerned, add them immediately after baking while the cookies are still warm. For the darkest, most dramatic black cookies, definitely use black cocoa powder. Measure cocoa powder by spooning it into the measuring cup and leveling it off, just like flour, to ensure accuracy. When baking, remember to follow general food safety guidelines to ensure your treats are not only delicious but also safe to eat.
Serving, Storage & Variations
Serving Suggestions
Enjoy these delicious halloween cookies warm, straight from the oven, or let them cool completely. They pair wonderfully with a tall glass of cold milk or a steaming mug of hot cocoa on a chilly autumn evening. These festive treats are perfect for sharing at parties or enjoying as a spooky snack.
Storage
Store your completely cooled halloween cookies in an airtight container at room temperature for up to 5 days. To keep them extra soft, add half a slice of bread or a small tortilla to the container; it helps maintain moisture. You can also freeze baked cookies in an airtight freezer-safe container for up to 3 months. For convenience, freeze unbaked cookie dough balls on a baking sheet, then transfer them to a freezer bag for up to 3 months. Bake from frozen, adding a couple of extra minutes to the bake time.
Variations
Easily transform these spooky halloween cookies into bars! Press the dough into a greased 9×13-inch baking pan. Bake at 350°F (175°C) for 25-30 minutes, or until a toothpick inserted in the center comes out with moist crumbs. Let them cool completely before slicing into bars. For other holidays, simply swap the Halloween M&Ms for red and green for Christmas, pastels for Easter, or red, white, and blue for patriotic celebrations.
Nutrition
Please note that the following nutrition information is an estimate based on ingredients and preparation, and may vary depending on specific brands and exact measurements used. This recipe for halloween cookies yields approximately 2 dozen cookies.
| Amount Per Serving |
|---|
| Calories: 200 |
| Total Fat: 10g |
| Saturated Fat: 6g |
| Cholesterol: 25mg |
| Sodium: 140mg |
| Total Carbohydrate: 28g |
| Dietary Fiber: 1g |
| Total Sugars: 18g |
| Protein: 3g |
FAQ
- What kind of cocoa powder should I use? Use black cocoa powder for the darkest color and an Oreo-like flavor. Dutch-process cocoa offers a rich chocolate taste and a slightly browner appearance.
- Will candy eyeballs melt in the oven? Typically, candy eyeballs hold their shape during baking. If you are very concerned, you can always press them onto the warm cookies immediately after they come out of the oven.
- Why did my cookies come out flat? Flat halloween cookies often result from butter being too warm or overmixing the dough. Ensure butter is cool room temperature and mix only until combined.
- Can I freeze these cookies? Yes, you can freeze both baked cookies and unbaked cookie dough. Freeze baked cookies in an airtight container, and freeze dough balls on a tray before transferring to a bag.
Conclusion
These spooky and easy halloween cookies are truly a magical addition to your festive celebrations. With their simple one-bowl prep, delightful double chocolate flavor, and fun decorations, they are perfect for bakers of all skill levels. Get ready to impress everyone with these irresistible treats! We encourage you to try this recipe, embrace the spooky season, and share your fantastic creations with Sweet Emily online.
Spooky & Easy Halloween Cookies
Equipment
- Oven
- Baking sheets
- Parchment paper
- Stand mixer
- Paddle attachment
- Bowl
- Whisk
- Rubber spatula
- Large spring-loaded cookie scoop
- Wire rack
Ingredients
Cookie Dough
- 1/2 cup cup unsalted butter at cool room temperature
- 1/2 cup cup granulated sugar
- 1/4 cup cup brown sugar
- 1 teaspoon vanilla extract
- 1 egg at room temperature
- 1 cup cup all-purpose flour
- 1/2 cup cup black cocoa powder (or Dutch-process), sifted
- 1 tablespoon cornstarch
- 1 teaspoon fine sea salt
- 1/2 teaspoon baking soda
- 1/4 teaspoon baking powder
- 1/2 cup cup white chocolate chips plus more for garnish
- 1 cup cup Halloween M&Ms plus more for garnish
- Edible candy eyeballs for garnish
Instructions
Preparation
- Preheat your oven to 350°F and line baking sheets with parchment paper.
- In a stand mixer, beat the butter and sugars until light and fluffy; then scrape the bowl, add vanilla and egg, and beat until combined.
- Whisk dry ingredients in a separate bowl, then gradually add them to the wet ingredients, mixing until a sticky dough forms. Fold in the white chocolate chips and M&Ms.
- Scoop 3-tablespoon sized dough balls onto prepared baking sheets, spacing them out. Garnish with extra chips, M&Ms, and candy eyeballs. Bake for about 12 minutes until puffy but still soft, then cool on the baking sheet for 5 minutes before transferring to a wire rack to cool completely.
Notes

A 48-year-old contributing writer based in New York City. He is known for his insightful articles on American cuisine and food culture. With a lifelong passion for cooking and storytelling, David began his journey in the culinary world as a chef before transitioning to writing. He has contributed to various food magazines and blogs, sharing his experiences, recipes, and culinary tips, inspiring home cooks and food enthusiasts alike. Through his engaging writing style, David explores the rich tapestry of American cuisine, celebrating its diversity while encouraging readers to experiment in their own kitchens.